
In this guide, we will take you through two simple methods so you can learn how to set a default printer in Windows 10.
Are you tired of setting a different printer every time you print out your documents on your Windows 10 device?
With a wide range of printers available for specific purposes, it’s common for users to have multiple printers connected to the same computer.
While connecting the frequently used printers with your device is a smart move, it might result in trouble and confusion. This is because Windows 10 uses your location to identify and set the default printer on your PC.
So, if you use two printers, your frequently used printer will be your default printer option for all your printing applications.
Although helpful, this default function will not work when you are willing to use another printing device.
A simple way of dealing with this is to turn off this default functionality and choose a printer manually to set it up on default mode. You can revert these changes by turning on the default feature again.
Below we’re analyzing two easy ways to set a default printer in Windows 10.
Table of Contents
How to set a default printer in Windows 10
Using Settings
The majority of people prefer using Windows Settings to change the default printer as it is easy to access and understand. You can change your default printer settings using the Settings app or turn off the auto-select option using the following steps:
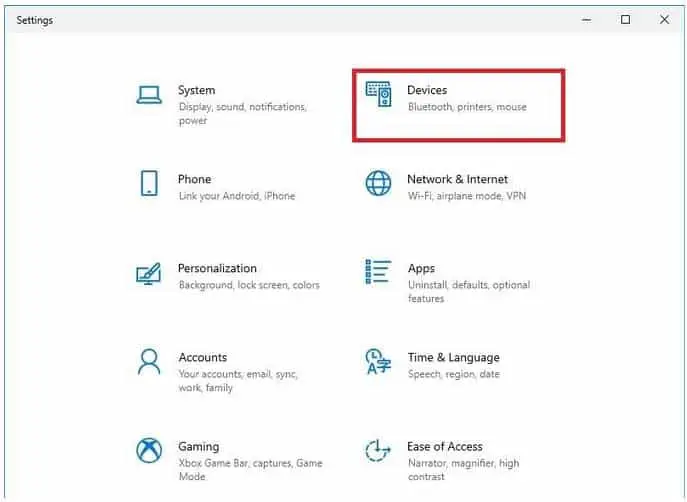
- Press the “Windows key + I” to open the “Settings” app. Alternatively, another way to open Settings in Windows 10 is through the Start Menu;
- In Settings, tap on “Devices”;
- Switch to the “Printers & scanners” tab and uncheck the “Let Windows manage my default printer” option. Once you uncheck it, it will show you the printer, which has been set as the default one;

- Now choose your preferred printer or scanner and click it to view the options;

- Finally, click on the “Manage” option and select “Set as default” in the next window to set the selected printer or scanner as the default device;

- You can go back to the previous settings and choose the default printer according to your location by checking the “Let Windows manage my default printer” option again.
Using Control Panel
While setting a default printer in Settings is pretty simple, some people prefer relying on Control Panel for accessing or modifying things in Windows 10.
These steps will help you in removing your default printer and choosing a different one for your system:
- Press the Start button, type “Control Panel” and then press Enter;

- Click on “View devices and printers” which is located below “Hardware and Sound” in the computer settings window;

- In the printers window, select the desired printer you want to set as default and right-click on it to see the context menu;
- Lastly, click on the “Set as default printer” option in the menu. You will now be using this printer to print all of your files.

Wrap Up
Having a printer at home or office is a blessing as it lets you print everything from business cards and birthday cards to colorful posters and photos.
However, when you have a different default printer selected than the one you currently want to use, it can lead to massive frustration and waste of time.
So, make sure it never happens and use this guide to set your printing preferences in Windows 10 before you begin printing.
Check out some of our other awesome articles:
- Changing the DNS in Windows 10
- How can I flush DNS in Windows 10?
- Finding and changing IP address in Windows 10
- How can I clear the clipboard contents in Windows 10?
- How can I open Task Manager in Windows 10?
- Changing the language in Windows 10
- How to show the battery percentage in Windows 10?
- Changing Windows 10 default folder view
- How to fix Windows 10 night light when it’s not working