

This article will explain to you how to find and change your IP address in Windows 10.
What is an Internet protocol, and how does it work? An IP address is a number that is assigned to your device when connected to a network.
The IP consists of two numbers: one is the local/private IP address that identifies you on your local network router, and the other is the public IP address that identifies you on a wider network.
A typical IP address formation is 192.168.xx.xxx. Your router assigns this unknown value.
But do you know you can set an IP address on your own? There are many outstanding and cool features Windows 10 has updated over the years, enhancing your OS experience.
How to find and change IP address in Windows 10
In today’s article, we are unraveling one such cool part for you from Windows 10.
We’ll take you on a journey to learn how to find and change IP addresses in Windows 10. So, without wasting any time, let’s begin.
Before changing, we need to find a set of information, i.e., your computer’s IP address, subnet mask, and default gateway assigned by your router. To see this information, perform the following steps:
- Press “Windows key + R” to launch the Run prompt;
- Type “cmd” in the open bar to open the Command Prompt window;
- Press Enter;
- Type ipconfig and press Enter;
- All your existing internet protocol information will be displayed on the screen.
Change IP address through Network settings
- Go to the Start Menu;
- Navigate to the Settings app and left-click;
Or
- Use the keyboard shortcut “Windows key + I”;

- Click the “Network and Internet” tile;
- A new window opens. If you use the Internet via a wireless network connection, select “WiFi” from the left window pane. If you use the Internet via a wired network connection, select “Ethernet” from the left window pane;
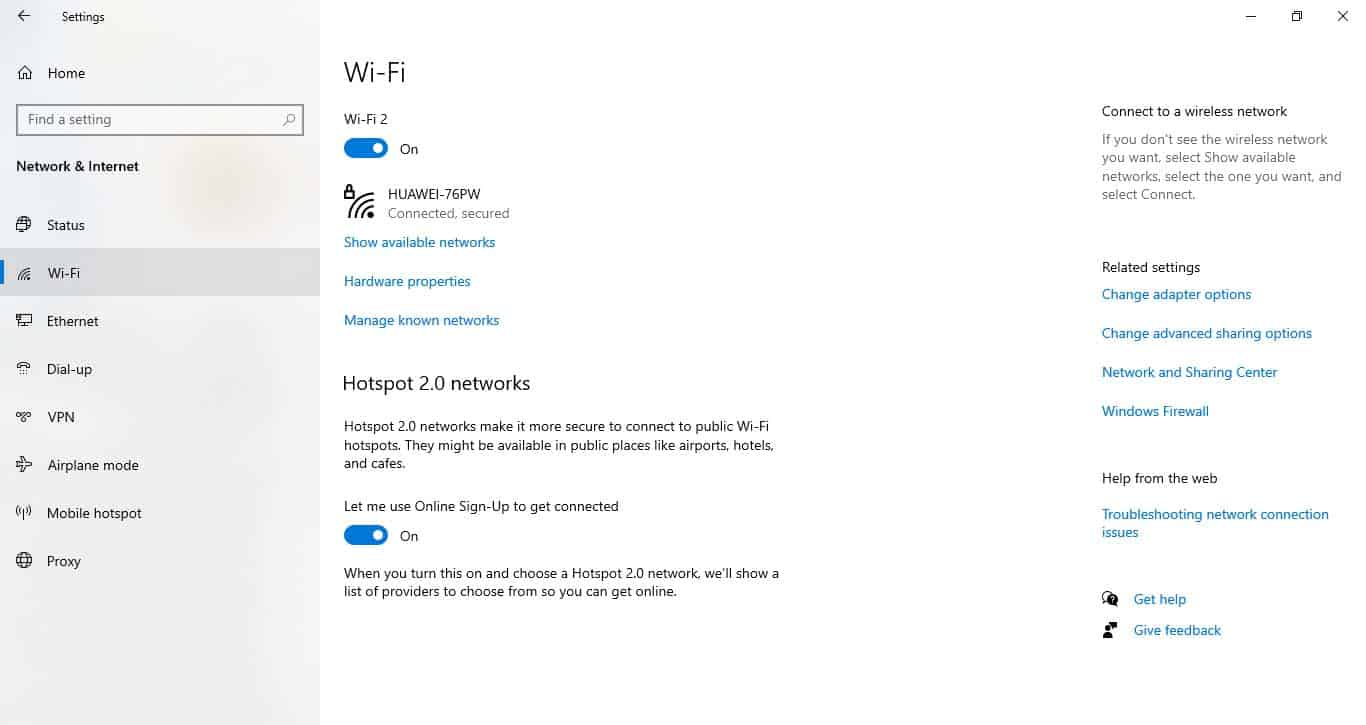
- After clicking WiFi or Ethernet, click on your network connection name;

- Your internet connection details appear. Scroll down and search for “IP settings”. Under IP settings, click “Edit”;

- The properties segment contains all information that you might need to change your IP address. For example, it shows your existing IP addresses, subnet mask, and default gateway, which you will need in the following steps;
- A dialogue box opens with drop-down options. The selected option will be Automatic (DHCP). Here you can change your IP address. The automatic (DHCP) option allows your router to assign an IP address to your computer device automatically. This IP address is known as a dynamic IP address;
- If you want to change or set a new IP address (static IP address), select “Manual” from the drop-down menu;

- Now you need to enable either IP4/IP6 or both depending upon your internal protocol preferences;

- After enabling any or both IPs, a new window opens. If you enable both, you need to fill these windows for both IPs. For this example, we are changing the IPv4 address;
- IP address bar: In the IP address bar, enter the desired IP address you wish to have for your device. We are changing it to: 192.168.00.1

- Subnet prefix length bar: Subnet prefix length is a number determined by the subnet mask of your router. For example, our router has a subnet mask 255.255.255.0. This implies that your subnet prefix length is 24 bits.

- Gateway bar: Type the default gateway key of your router device derived from the command line prompt. The key is similar to your IP address.

- Preferred DNS server & Alternate DNS server: You can skip both. They will be assigned automatically by your router.
- Click Save.
Note: Please ensure that all the information you enter (static IP address, subnet prefix length, and gateway) is correct. To get accurate information, we have already shared with you a precise method.
If any information is incorrect, your Windows 10 computer may likely lose connection with your router. You can revert to a dynamic IP address by switching your IP setting to automatic (DHCP) in any such scenario.
Change IP address through Control Panel
- Go to the Start Menu;
- Open the Control Panel window;
- Click on “Network and Internet”;

- Your network name appears next to “connections”. Click on your Network Name;

- A window opens, showing stats of your network connection. Click on “Properties”;

- A list of properties will be shown. Double click on Internet Protocol Version 4 or Internet Protocol Version 6. If you want to change both, you can change both separately by following these steps:

- After double-clicking, a new window opens. Tick “Use the following IP address”. Now you can assign a static IP address by entering the same information from the first method.
- After entering the desired IP address, subnet mask, and default gateway, you can omit preferred and alternate DNS server address.
- Please make sure to tick the “validate settings upon exit” box;

- Click “Ok”.
Change IP address through Windows PowerShell
- Go to the Start Menu;
- Type Windows PowerShell and open it;

- Type the “netsh interface ip show config” command;
- A list of network connections appears on your screen. First, pick the name of the router/network connection for which you wish to change your IP address;

- Dynamic IP address: To configure a new dynamic IP address, type the following command: “netsh interface IP set address ‘your network name’ dhcp“. Put your network as it was displayed in the list, but with quotation marks;

- Static IP address: To configure a new static IP address, type the netsh command: “netsh interface IP set address name= ‘your network name’ static *IP address number* *subnet mask number* * gateway number*”;
- Press Enter.

Note: You can check whether your new IP address is set or not by simply typing “ipconfig” in the Command Prompt.
Wrap Up
The methods mentioned above work when you want to set a static local IP address. But what if you’re going to set your public IP address?
Your internet service provider assigns the public IP address to you.
So, the liberty to either reset or change them is within their capacity. What you can do is hide your public IP address through a VPN.
There are other methods, such as using a proxy server or using a Tor network, but a VPN is a reliable and sustainable solution.
A VPN service allows you to disguise your IP address by choosing an IP address from an entirely different country.
Now you must be wondering how you can access those websites even that are banned in your country through a VPN service.
You can download and install a VPN service of your choice. some are paid, and some are free as well.
Check out some of our other awesome articles:
- How can I clear the clipboard contents in Windows 10?
- How can I open Task Manager in Windows 10?
- Changing the language in Windows 10
- How to show the battery percentage in Windows 10?
- How to convert a JPG image to PDF format
- Changing Windows 10 default folder view
- How can I sort folders by size in Windows 10?
- How to fix Windows 10 night light when it’s not working
- How do I change folder icons in Windows 10?
