

Knowing how to change DNS in Windows 10 is useful in a bunch of situations.
Do you want to obtain a more secure and faster DNS server, which can maintain your online privacy and provide you instant access to your favorite pages?
If yes, then changing your computer’s DNS server settings will help you achieve it all.
This guide will show you three simple ways to change DNS settings on your Windows 10 PC.
Table of Contents
How to change DNS in Windows 10
When you subscribe to an internet connection, your Internet Service Provider (ISP) allocates you a custom DNS address, which allows you a faster browsing experience.
This is because your ISP’s DNS server becomes the default DNS server on your system, so you don’t need to type an IP address every time you visit a site.
However, the problem arises when your ISP’s server is unreliable and operates at a slower speed.
In this case, you might want to change your current DNS server to a new and better one.
Here’s how you can do this in Windows 10:
Change DNS server in Windows 10
Typically, you can change your device’s DNS setting using Windows Settings, Command prompt, and Control Panel.
You can also make use of a DNS resolver for this purpose.
However, it’s best to use the built-in apps to avoid downloading possible malware on your system.
Note: Before you follow any of the below-mentioned methods, make sure to note down the default DNS server address, so you can always get back to the previous settings at any time.
Changing DNS using Settings
This is the preferred and easiest way of changing DNS on a Windows 10 device. Follow these steps to change DNS using the Settings app:
- Go to the “Start menu” and tap on the “Settings” icon to open it. You can also hold the Windows key + I to open Settings;

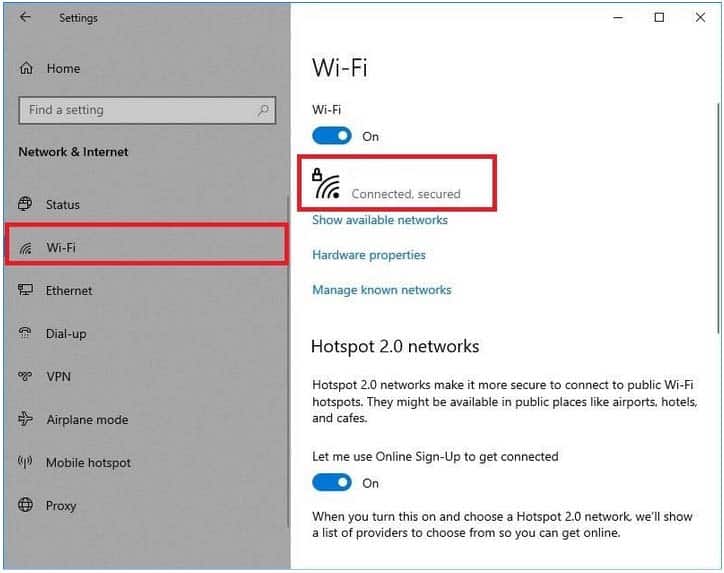
- In the Settings window, tap on “Network & Internet”;

- Switch to the “Wi-Fi” or “Ethernet” tab depending upon the network you are using and click on the connected network. In this picture, we are using a Wi-Fi connection;
- Scroll down to the “IP settings” and click on the “Edit” button to change the IP assignment;

- In the “Edit IP settings” window, select the “Manual” option and click “Save”;

- Now, turn on the IPv4 button and input values for “Preferred DNS” and “Alternate DNS” based on the DNS server preference;
- For Google Public DNS uses IP addresses: 8.8.8.8 and 8.8.4.4, respectively;
- For OpenDNS use: 208.67.222.222 and 208.67.220.220, respectively;
- For Cloudflare DNS: 1.1.1.1 and 1.0.0.1, respectively;
- Finally, click “Save” and you’ll now be using a new DNS server.

Changing DNS using Command Prompt
Running commands on the Command Prompt utility is another way to change your system’s DNS address.
For this, you will need to open the Command Line as an administrator.
Here’s how you can take advantage of this utility for changing your DNS server:
- Press the Windows key and type “cmd” in the Windows search box;
- Open the Command Prompt app by clicking on the “Run as administrator” option;

- Now, type or paste the following commands in the Command window and hit “Enter” to know the state, type, and interface name of the network adapter that you are currently using:
“netsh”
“interface show interface”

- Once you have identified your DNS network, input the following command replacing the “Adapter-name” with your current adapter and “X.X.X.X” with the earlier selected IP address:
Interface ip set dns name=”ADAPTER-NAME” source=”static” address=”X.X.X.X”
For example, here, we have put “Wi-Fi” and “1.1.1.1” in place of the “ADAPTER-NAME” and “X.X.X.X”, respectively.
- For Google Public DNS use: 8.8.8.8 and 8.8.4.4, respectively;
- For OpenDNS use: 208.67.222.222 and 208.67.220.220, respectively;
- For Cloudflare: 1.1.1.1 and 1.0.0.1, respectively;
After you have selected the IP address of your primary DNS, it’s time to insert the IP address of your secondary DNS. For this, you have to use the same command except add “index=2” at the end of the above command and replace “1.1.1.1” with your preferred IP address.
Interface ip set dns name=”ADAPTER-NAME” source=”static” address=”X.X.X.X” index#2
In this step, we have used “Wi-Fi” and “1.0.0.1” in place of the “ADAPTER-NAME” and “X.X.X.X”, respectively.

Your Windows 10 device will now start using the newly selected DNS server.
Furthermore, you can list more DNS addresses by using the above commands by increasing the current index value by 1, like index=3, index=4, and so on.
Changing DNS using Control Panel
In addition to the above two methods, you can also change the DNS server of your Windows 10 computer using the Control Panel app. Below are the steps you need to follow to substitute your old DNS server with a new one:
- Press the Windows key and type “Control Panel” in the Start Menu. Press “Enter” to open it;

- Tap on the “Network and Internet” option in the app’s window;

- Click on “Network and Sharing Center” to view your network information;

- Now, tap on the “Change adapter settings” in the left pane of the window to open “Network Connection”;

- Go to your network device, right-click on it and then choose the “Properties” option from the menu;

- A new “Wi-Fi Properties” window will pop up. Click and check on the “Internet Protocol Version 4 (TCP/IPv4)” in the “Networking tab”;
- Next, click on the “Properties” button to open IP settings;

- Now, tap on the “Use the following DNS server addresses” option and input your preferred IP addresses;
- For Google Public DNS uses 8.8.8.8 and 8.8.4.4, respectively;
- For OpenDNS use 208.67.222.222 and 208.67.220.220, respectively;
- For Cloudflare: 1.1.1.1 and 1.0.0.1, respectively;
- Finally, click on the “OK” button at the end of the window to save and apply the changes.

Wrap Up
The performance of your DNS server primarily depends upon your location. The closer you are to your ISP, the faster will be your browsing experience.
Moreover, other factors like bad weather can also affect the performance of the server.
So, a delay of a few milliseconds is fine while browsing.
However, sometimes your ISP might store the DNS requests of your frequently visited websites and share them with government organizations, which may be a possible privacy concern for many people.
In conclusion, it’s suggested to change DNS only when you suspect privacy concerns or experience lengthy delays while loading a site.
For this, you can use any of the above methods to change your DNS server in Windows 10.
Check out some of our other awesome articles:
- How can I flush DNS in Windows 10?
- Finding and changing IP address in Windows 10
- How can I clear the clipboard contents in Windows 10?
- How can I open Task Manager in Windows 10?
- Changing the language in Windows 10
- How to show the battery percentage in Windows 10?
- How to convert a JPG image to PDF format
- Changing Windows 10 default folder view
- How to fix Windows 10 night light when it’s not working
