If you want to add a virtual machine and you’re willing to learn how to enable virtualization in Windows 10, this article’s for you. This guide features two simple ways of enabling hardware virtualization.
Windows 10 saw the introduction of many useful things, one of them is its ability to support which is a great .
This powerful tool allows you to run a virtual machine on your computer with the help of virtual machine software called Hyper-V.
The newly added virtual machine works as an entirely separate machine from your main system.
With virtualization technology enabled, you can install and test various new programs on your Windows PC without the fear of corrupting the whole system.
Also, this virtualization technology makes your computer faster and lets it execute functions more efficiently.
Table of Contents
- How to enable virtualization in Windows 10
- How to enable virtualization
- Turning on Hyper-V in Control Panel
- Wrap Up
How to enable virtualization in Windows 10
System requirements to enable virtualization
Before jumping on how to enable virtualization in Windows 10, it is important to know if your computer supports it or not. Unfortunately, not all Windows 10 operating systems are equipped with Hyper-V software.
Additionally, your processor must fit some requirements to run a virtual machine on your system.
Here’s what your system needs to have to support virtualization in Windows 10:
- Windows 10 Pro or Windows Enterprise;
- 64-bit processor and 4 GB RAM;
- Enabled Hardware virtualization on your computer’s BIOS;
- Sufficient hard drive space to add and run an additional operating system;
- Your PC must support SLAT (Secondary Level Address Translation).
To check your processor (CPU) type and Windows Edition, go to “Settings” > “System” and “About”:

If your hardware and processor fulfill the above criteria, it’s time to enable virtualization on your PC.
Does your system support hardware virtualization?
As said earlier, not all systems are capable of creating virtual machines. Therefore, it’s essential to know if yours comes with built-in virtualization technology or not.
Follow these steps to check whether your system supports virtualization or not:
- Press “Windows + R” keys to open the “Run” box;
- Type “cmd” in the Run box and hit “Enter”;

- Once the command prompt gets opened, type or paste the following command and hit “Enter”: systeminfo.exe
- Scroll down to the bottom of the command window. If you can see the “Hyper-V” section, your system supports Virtualization:

- Now, check the information under “Hyper-V Requirements”. If the “Virtualization Enabled In Firmware” option says “No”. It means virtualization is disabled on your system. If it says “Yes”, it is enabled.
Another easy way of finding out if your system supports virtualization or not is by going to the “Performance” tab in Task manager.
If your system has the option to be virtually operated, you will find the “Virtualization” option here:

How to enable virtualization
There are two common ways of enabling virtualization technology in Windows 10.
One is by accessing BIOS Setup, and the other one is by Computer Settings. Below, we have discussed both one by one:
By changing BIOS settings
There are many ways to enter the BIOS setup as it differs from manufacturer to manufacturer. Usually, you can enter the BIOS by pressing hotkeys like F1, F2, Del, or Esc.
Besides, you can also Google which keys work for your system to save some time.
Once you know the correct way for entering BIOS; follow these steps to turn on virtualization by changing a BIOS setting:
- Restart your computer and press the hotkey that works for your system to enter BIOS;
- Go to the “Security” tab and select “Virtualization”. Press the “Enter” key to open the Virtualization settings;

- Select “Intel (R) Virtualization Technology” and then “Enabled” to enable virtualization on your computer;

- Now, go back to the BIOS menu and open the “Restart” tab;
- Select “Exit Saving Changes” and hit Enter to save configuration changes and exit from BIOS;

- Finally, restart your computer to enable virtualization on your computer.
Using system settings
In addition to the above method, you can also enable virtualization in Windows 10 in system settings.
Note: If your computer uses legacy BIOS instead of UEFI, this method will not work for your system.
- Hold “Windows + R” keys to open “Settings”;
- In Settings, click on “Update & Security” and then switch to the “Recovery tab”;

- Tap on “Restart now” under the “Advanced Startup” section;

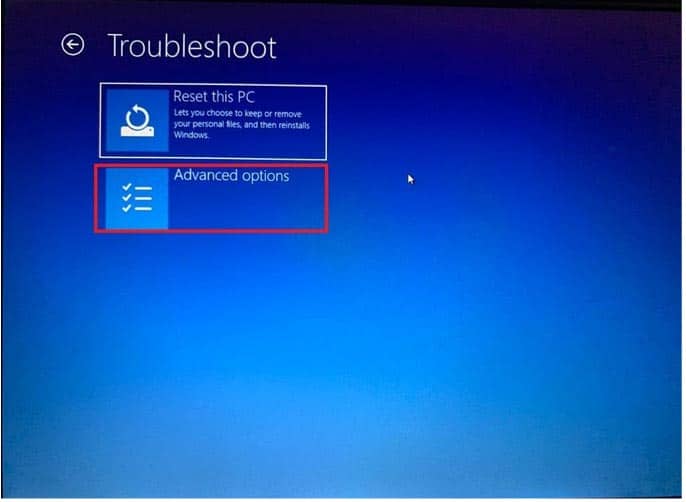
- You will enter the Windows startup settings. Click on the “Troubleshoot” option;

- Next, go to “Advanced options”;

- In the Advanced options, open “UEFI Firmware Settings” and click “Restart”;
- Once in the UEFI boot settings go to the “Configuration” tab or “Advanced” tab (the tab name differs from computer model to model), and turn on “Intel Virtual Technology”.
Since the technology name depends on the processor you are using, it can be different from the above-mentioned virtualization technology.
Remember, you have to look for the option having “Virtualization” or “Virtual technology” contained in its name. For example, Hyper-V technology, AMD-V for , etc.
Turning on Hyper-V in Control Panel
After enabling virtualization on your Windows 10 system, you will need to enable virtualization software “Hyper-V” in the Control Panel to manage and run virtual machines.
Follow these steps to in Windows 10:
- Open “Control Panel” and go to “Programs”;

- Tap on “Turn Windows Features On and off” and select/check the “Hyper-V” box present there;
- Finally, click “OK”. Windows will then configure for a few minutes and then restart to apply the saved changes to your PC.
Wrap Up
Windows Virtualization is the best way to test and run suspicious or new apps inside a virtual machine as it eliminates the risk of corrupting the actual system.
In this article, we’ve tried more than one method.
Just pick which one that works the best for you.
Check out some of our other awesome articles:
- Changing Windows 10 default folder view
- How can I sort folders by size in Windows 10?
- How to fix Windows 10 night light when it’s not working
- Windows 10: the pros and cons of using it
- Deleting backup files in Windows 10
- Changing the screensaver in Windows 10
- How do I change folder icons in Windows 10?
- Guide to install Windows without losing data
- How can I create a Windows 10 backup image?
- Blocking programs from accessing the internet in Windows 10
- Turning on/off Airplane Mode in Windows 10
- How to run programs as administrator in Windows 10?

