
This article explains how to remove write protection from a USB drive in Windows 10. USBs make up a considerable part of our digitally-driven lives today.
There are numerous reasons why a USB drive is our tech best friend.
To begin with, a USB flash drive allows you to store your precious digital data. You can also transfer data from one device to another with a USB drive.
To make sure that your data is well-protected, the drive has a write protection option. This means that if a pen drive has write protection on it, you can only read data.
That’s right! You cannot write a new file on your pen drive. In addition to that, with write protection mode on, you cannot even modify or edit an existing stored file on your USB drive.
While the write protection secures your existing data from modifications or erasure, it locks your USB drive from any new file writing or formatting.
Two possibilities may occur if your flash drive has enabled write protection.
For example, if you try to format your USB flash drive, it shows an error message “Your device needs permission”.
Possibility number two is when you try to write new data or modify existing data stored on your USB stick, it shows a notification “Your device is write-protected.”
Both situations mean that your removable disk/pendrive has a write protection error.
Are you stuck in a similar situation?
Are you unable to format data or write any new files on your pen drive?
Or are you interested in exploring this feature and trying it for your backup files?
Please do not fret; we have got your back.
Table of Contents
How to remove write protection from USB drive in Windows 10
In this article, we are teaching you a couple of options on how you can disable the write protection feature from your USB drive on a Windows 10 device.
These methods are also applicable to other Windows versions and can be used to enable protection as well. The methods can also be used for an SD card or an external hard drive.
So, without further ado, let’s get right into it.
Remove write protection through hardware
Now, some USB flash drive designs have a hardware switch button to enable or disable write protection. This lock switch can be situated anywhere on the drive’s hardware.
If your pen drive is already write-protected, slid the switch to the other side and remove write protection.
You can slide the write protection button and vice versa to enable write protection.
Note: Not all USB pen drive designs have a physical switch for write protection. Now we’ll look at several other methods to disable write protection from Windows.
Remove write protection through File Explorer
- Open File Explorer;
- Right-click on your USB drive/removable disk and click “Properties”;

- A box opens. Go to the “Security” tab;
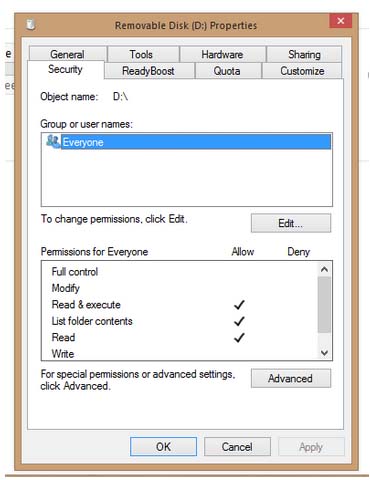
- Check Permissions. If write protection is on, you will not see a tick mark against the write option. A tick means you can write on your flash drive or hard drive;

- To change, go to “Edit” and check the “Write” tick box under permissions.
Remove write protection through “Diskpart Command Line”
Please follow the steps mentioned below:
- Press Windows key + R to open the Run dialogue box;

- Type “Diskpart” in the open bar and click “Ok” to open Diskpart Command Prompt;

- Diskpart Command Prompt window appears on your screen;
- Type “list disk” after Diskpart>;
- Press Enter;
- A list of all your internal and external storage devices appears. Check the number of the USB drive or disk you wish to work on under the “disk ##” column. You can guess your USB flash drive by its size mentioned in the size column;

- Type “select disk A” after Diskpart>. A is hypothetical. You can put your own disk number;
- Press Enter;
- Your desired disk will be selected;
- Type “attributes disk clear readonly” after Diskpart>;
- Press Enter;

- You will see “Disk attributes all cleared successfully”.
Note: Unplug your USB flash drive and re-plug it to check if write protection is disabled or not.
Remove write protection through “Tweak Windows registry Regedit”
- Type Windows key + R to open the Run dialogue box;
- Type “Regedit” in the open bar and click “Ok” to open the registry editor;

- Windows registry opens. Click on “HKEY_LOCAL_MACHINE” from the left window pane;

- Click “System” from expanded options;

- Click “CurrentControlSet” from expanded options;

- Click “Control” from expanded options;

- Click “storage management/ storage device policies” from the expanded option;

- The full path to follow is HKEY_LOCAL_MACHINE?SYSTEM?CURRENT CONTROL SET?CONTROL?STORAGE MANAGEMENT/ STORAGE DEVICE POLICIES;
- On the right pane, double-click the “WriteProtect” feature. A dialogue box will open. You can change the value data here. To enable write protection, enter 1. To disable write protection, enter 0.
If you cannot locate storage management/ storage device policies or the write-protect feature, then you can follow this procedure:
- Right-click on “Control” and click New? Key

- A new key box will emerge. Name it “StorageDevicePolicies”;


- Now right-click “StorageDevicePolicies” and go to New?QWORD (64-Bit) Value;

- A new key box appears in the right window pane. Rename it to “WriteProtect”;

- Double click and modify “Value Data.” Set the value to 0 to remove write protection.

Note: Exit the registry editor, restart your device, Re-plug your USB device into the USB port, and check if USB write protection is disabled or not.
Remove write protection through a third-party app
There is always a third-party solution for your software problems.
If the abovementioned methods are too complicated or don’t work for you, you can opt for third-party software and remove write protection errors from your USB flash drive.
We recommend you try and tested one so that any malware does not harm your computer device or pen drive.
- Download EaseUS clean genius from https://www.easeus.com/cleangenius/index.htm;
- Open the downloaded file and install the software;
- Open the program and select “Optimization” from the left window pane;

- Go to the “Write Protection” option in the right window pane;
- A new window appears. Select your flash drive/removable disk from the “Choose Drive” bar and click on the “Disable” button.

Remove write protection through formatting USB
If the methods above don’t work for you, you can always opt for formatting your USB drive.
But how can you format your pen drive if the write protection feature is on?
Well, there are two solutions to your problem.
Formatting USB drive through Diskpart command
- Type Windows key +R
- The Run dialogue box will open;
- Type “Diskpart” in the open bar to open the Diskpart Command Prompt;
- Diskpart Command Prompt window appears on your screen;
- Type “list volume” after Diskpart>;
- A list of all your internal and external drives appears. Check the number of the USB drive you wish to work on under the “volume ##” column. Here volume denotes your internal drives and external disk/USB flash drive. You can guess your flash drive by its size mentioned in the size column;
- Type “select volume A” after Diskpart>. A is hypothetical. You can put your own disk number;
- Press Enter;
- Your desired disk will be selected;
- Type “format fs=ntfs label=’new volume’ quick” after diskpart>;
- Press Enter.

Formatting USB drive through File explorer
- Open File Explorer;
- Right-click on USB flash drive/removable disk;
- Click “Format” from the menu;

- A new dialogue box opens: select “NTFS” from the File system drop-down menu;

- Click “Format”.
Wrap Up
A USB flash drive is your pocket-friendly data storage device. While it allows you to store and transfer data remotely, the write-protected USB drive locks all your data to keep it intact and safe.
On the other hand, write protection prohibits your pen drive from writing any new file or data as well.
Of course, every technological feature has its pros and cons.
The real trick is to learn an element comprehensively with all dos and don’ts and then use it for optimum results.
Check out some of our other awesome articles:
- How can I open Task Manager in Windows 10?
- Changing the language in Windows 10
- How to show the battery percentage in Windows 10?
- How to convert a JPG image to PDF format
- Changing Windows 10 default folder view
- How can I sort folders by size in Windows 10?
- How to fix Windows 10 night light when it’s not working
- How do I change folder icons in Windows 10?