

Today we’ll give you relevant insight on how to make a program run on startup on Windows 10.
Have you ever noticed that certain apps are programmed to launch by default every time your Windows 10 computer boots?
Skype, for example, is a startup app. It comes enabled with an auto-startup feature that makes the program run as soon as your PC starts.
Now put aside Skype for a minute and let’s talk about other programs that you use daily on your computer.
Isn’t it a hassle to launch the same programs every single time your PC boots?
Well, if your answer is yes then there’s some good news for you.
Similar to Skype, other applications on your Windows computer can be programmed to launch on startup as well.
Even if they don’t have the feature built-in, it can still be done.
Table of Contents
How to make a program run on startup on Windows 10
The obvious benefit of this feature is that you don’t have to launch the same programs individually every time.
Instead, they’ll be set to run automatically as soon as you turn on your PC.
So, how can you schedule your most-used programs to launch? The method is easy and simple:
- Launch the Run prompt by pressing the “Windows key + R” keyboard shortcut;
- Input “shell:startup” in the dialog box and press Enter;
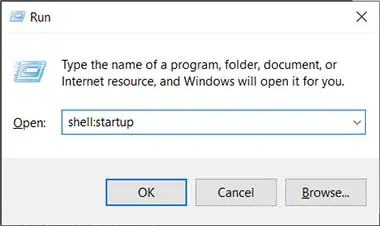
- The Run command would direct you to the Windows Startup folder. Here you must right-click and hover over “New;
- In the expanded list of contents, click on “Shortcut”;

- Windows will now ask you for the address of the program you want to be launched on startup. Type the address manually or navigate towards it through the “Browse” button;

- Once you’ve given Windows the address, click “Next”;

- Now you’ll be asked to name the program’s shortcut. Type a name or leave it as default then click the “Finish” button.

From now on, the program shortcut that you added in the startup folder will run automatically as soon as your PC starts. It’s a startup program.
What is the Startup folder?
The startup folder is the place where programs supposed to launch on startup are stored.
If you want to stop a program from launching automatically, then you’ll have to exclude it from the startup folder.
Moreover, Windows does not bound you by allowing you to add just programs or applications in the user’s startup folder.
Instead, if you want a file or folder to launch the same way, you can add a shortcut to it in the startup folder and have it opened as soon as your PC boots.
The startup folder was the only way to enable programs to auto-launch in older versions of Windows.
However, now in Windows 10, we have the Command Line (Command Prompt) and a separate startup apps panel available to be accessed.
Here’s how you can change startup application settings through that panel:
- Click on the Windows Start button on the left side of the taskbar and then click “Settings” to access Windows settings;

- Navigate to “Apps”;
- In the panel pinned to the left, click on the last button: “Startup”;

- Here Windows will show you a list of startup programs. You may turn their auto-launch feature On/Off by toggling their switch.

There is also another method of enabling/disabling startup apps. In this one, we get things done through the Task Manager window. Here’s how to do it:
- Click on the Windows Start button, type “Task Manager”, then open it. You can also launch it by holding down “Ctrl+Shift” and pressing “Esc”;

- Click on “More details”;

- Then click on the “Startup” tab;

- Here you’ll find a list of programs that can be launched automatically on startup. You can enable/disable any of these by right-clicking on them.

If you’re logged in as the system administrator user account, the task manager would show you additional information about startup apps.
This includes the program’s impact on your PC, its address, status, publisher, etc. And that brings us to an important issue that we must clarify.
Should you add more apps to the Startup folder?
Windows already has the necessary programs in the startup folder to work correctly. Therefore, you don’t have to worry about what to add or remove from there except for the specific apps that you regularly use.
However, it is generally recommended to not add too many programs to the startup menu, especially if your computer has average or low processing power.
Increasing the number of programs set to launch initially may possibly result in your PC taking ages to boot and be ready to use.
There’s already quite some load on your PC when it starts and adding more to it would mean purposefully making your PC slower.
So, not only should you refrain from adding unnecessary startup entries, but consider getting rid of any other needless shortcuts and programs that the Windows 10 startup folder might already have.
If you disable startup programs, that would result in a significant decrease in the amount of time your PC takes to boot causing a positive startup impact.
Wrap Up
The startup feature can be of great help and save loads of your time in the startup process.
However, make sure you keep the balance we discussed earlier and be cautious of overburdening your computer’s CPU.
Check out some of our other awesome articles:
- Changing the language in Windows 10
- How to show the battery percentage in Windows 10?
- How to convert a JPG image to PDF format
- Changing Windows 10 default folder view
- How can I sort folders by size in Windows 10?
- How to fix Windows 10 night light when it’s not working
- Windows 10: the pros and cons of using it
- Deleting backup files in Windows 10
- Changing the screensaver in Windows 10
- How do I change folder icons in Windows 10?
