

In this article, we’ll describe how to resize cells in Google Sheets. Sheets is a free-to-use application provided by Google. In many ways, it is similar to the well-known Microsoft Excel.
Google Sheets is primarily used to record data, perform calculations, draw different tables, pivot tables, and plot charts. You can either input text or numbers inside a Google Sheet.
Whenever you create a new spreadsheet, all the cells will be specific and identical.
However, as you input data in the sheet, you may require different cell sizes for different data entries depending on size.
You can change the selected row and column sizes in Google Sheets to adapt to different data sizes.
There are various ways to alter the row height and column width in a Sheets spreadsheet.
If you are perplexed about how to resize cells in Google Sheets, please do not worry, as we have got you covered.
This article will explain, step-by-step, how you can change the column width and row height in the Google Sheets app.
Table of Contents
How to resize cells in Google Sheets
Change row size using the manual method
If you cannot view the text or other forms of data in your spreadsheet, you might need to adjust either the row height or column width.
Please follow the steps mentioned below to resize rows in Google Sheets:
- Open your Google Sheets file. From the example in our image, you can observe that the first entry in the file is not completely visible;

- Now, hover your mouse cursor to the left-most part of the row where the text is not completely visible. As you can see, the cursor will change its shape to a two-sided arrow. You can now drag it down to increase the row height;

- You can observe now that the entry in the first row is visible. If you would like to decrease the row height, you can use the same double-faced arrows and drag them upward to increase it.

Change row size using the autofit method
If you have multiple rows with text that is not completely visible, it can be pretty challenging to resize all of them manually.
In such cases, using the autofit option might be a more practical approach.
Please follow the steps provided below to resize a single row or multiple rows using the autofit method in Google Sheets.
Please note that the technique works for both single and multiple rows.
- Select the single or multiple rows that you wish to resize. You can observe in the image below that multiple rows have data that is not completely visible. For this example, we have selected all the rows that have the stated issue;

- Now, move your mouse cursor to the left of the selected rows to be between two rows. When the cursor changes to a two-faced arrow, double-click to automatically adjust the row size.

Please note that this method will not make all the rows equal in size but will instead adjust the rows so that the text is visible in all the cells.
You can observe from the image that we have successfully changed the row size to properly show the text of the cell.
Change row size using the dialog box
You can also use the dialog box to change row height in Google Sheets.
If any row or multiple rows cannot fully show the text inside, you can perform the following steps to resize them.
- Select the row or rows you want to resize as shown below;

- Now, right-click and go to “Resize rows”;

- You will now come across two options – “Specify row height” and “Fit to data”. If you have a specific figure in mind to set the height of the row, input it. Otherwise, choose the “Fit to data” option and click “OK”. Google Sheets will now automatically adjust the rows to fit your data inside;
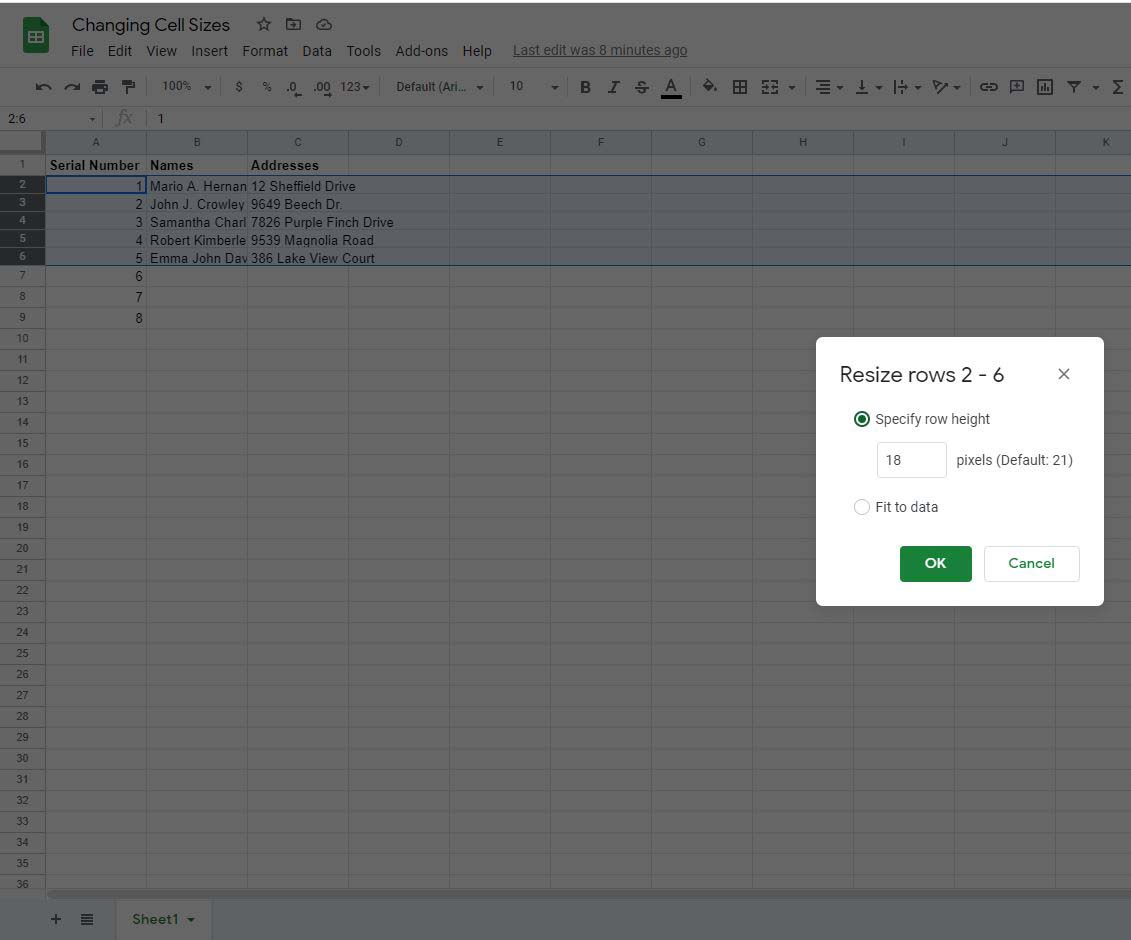

- You can observe now that the row sizes match the data present in our spreadsheet.

How to resize columns in Google Sheets
Similarly to resizing rows in Google Sheets, you can also alter the column size to fit your data accordingly.
Let’s dive into different methods to display text or data in the cells of your spreadsheet by altering the column width.
Change column size by using the manual method
- You can see in the image below that some data is not completely visible in our spreadsheet. This is because the columns do not appear to show the data in the cells properly;

- Select the lone column or multiple columns where you want to adjust the size, reveal the data, and move the mouse cursor to the top of your desired column. As the cursor changes to a double-sided arrow, use it to drag the column and reveal the hidden data or text in your selected cell;

- From the image below, you can see that now the text is completely visible in column B.

Change column size using the autofit method
Similar to the autofit method for rows, you can change the column width in a spreadsheet in Google Sheets to reveal data or text in different cells.
Please follow the steps mentioned below to use the autofit method to change the column width for a single column or multiple columns.
- Select the column whose width you want to alter. Then, bring the cursor to the top of the column, and when it changes to a double-faced arrow, double click to change the column width and autofit the data or text present in the cell content;

- You can see that the contents in columns B and C are now completely visible as we have changed the width of the columns.

Change column size using the dialog box
Akin to the row height method using the dialog box, the column width in your Google Sheets spreadsheet can also be altered to reveal text or data. To use the dialog box method and change the column width, please follow the steps below.
- Select a single column or multiple columns that you want to edit in your Google spreadsheet. As the column is less in width, the text is not completely visible;

- Right-click and go to the “Resize column” option to change the cell width;

- Now, you will get the option to enter a custom column width, or you can use “Fit to data” to automatically fit the data in the column of your spreadsheet;


- Using the “Fit to data” option, we have successfully changed the column width of the spreadsheet and all our text and data are visible now by changing the width of our columns.

Wrap Up
Google Sheets is an amazing utility that provides numerous options to handle data. The Google Sheets columns and cells are equal in size by default.
However, you can resize the cell size as per your requirements.
Because sometimes the text length is either too long or too short. If it is too short, you need to change the font size, but you need to resize the cell if it is too long.
You can either handle individual cells or multiple cells to adjust the size.
In addition, you can change the size of a selected row or selected column by using various techniques described in the article.
Check out some of our other awesome articles:
- Enabling virtualization in Windows 10
- Changing Windows 10 default folder view
- How can I sort folders by size in Windows 10?
- How to fix Windows 10 night light when it’s not working
- Windows 10: the pros and cons of using it
- Deleting backup files in Windows 10
- Changing the screensaver in Windows 10
- How do I change folder icons in Windows 10?
- Guide to install Windows without losing data
- How can I create a Windows 10 backup image?
- Blocking programs from accessing the internet in Windows 10
- Turning on/off Airplane Mode in Windows 10
- How to run programs as administrator in Windows 10?