

Knowing how to create a restore point in Windows 10 is essential to revert the system to a previous stage in the event of a critical problem after installing some software update, device driver, or application.
Before diving into that, we’ll first discuss what a restore point in Windows is.
Windows restore point is a feature by Microsoft Windows that stores a default set of all the vital system files and settings required by your operating system for optimal functioning.
Just as the name suggests, a restore point saves a functional state that your computer can go back to after installing an update.
A system restore point is just like a factory reset feature for Windows, but the cool thing here is that you can customize it.
There could be multiple reasons why you need to create a restore point for your computer.
For example, after installing an update or a third-party application, sometimes your Windows does not support it and shows some performance lags or even worse issues.
In such situations and conditions, you can simply reverse your action and revert to the normal performance of your Windows computer by performing a system restore through a restore point.
The ideal state is to create a restore point when your system is perfectly functional.
For instance, if you install an update or new software and your OS starts to misbehave, you can simply revert by going to a restore point.
But how to create a restore point in Windows 10? Please do not worry!
In this article, Turbo Gadget Reviews teaches you a chronological order method on how to make a restore point in Windows 10. You’ll find the details about various techniques for creating a restore point below.
Table of Contents
How to create a restore point in Windows 10
Activating the Restore Point feature
In Windows 10, the system restore point feature is disabled by default. So, in order to enable or customize restore points, you first need to activate it:
- Open the Start Menu and type “Create a restore point“;

- The System Properties window opens. Now go to the “System Protection” tab;

- Here you can see an option for “System Restore“. If the option is greyed out, that means your system restore point feature is disabled;
- If the option is disabled, then to enable protection, under “Protection“, a list of your storage volumes with their protection status appears. To enable the restore point feature, select the desired volume and click on the “Configure button“;

- System protection dialogue box opens. Now under “Restore settings“, click on “Turn on system protection“.

Note: You can adjust and customize the Disk Space Allocation for the System Restore Point after enabling the System Protection feature from the same dialogue box. If you want to set restore point settings manually, you can delete the default settings from the same window.
Creating a new restore point
The restore point creation is simple. Now that we have enabled the System Restore Point feature in Windows 10, you can customize settings by performing the following steps:
- Right-click on My computer ? Properties;
- This action will lead you to the System window. Now, click on the “Advanced system settings” option in the left window pane;

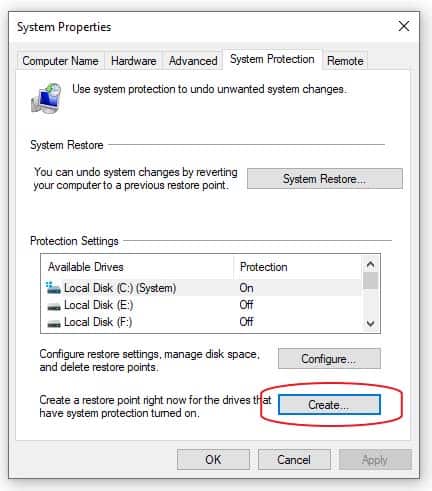
- System Properties window opens. Go to the “System Protection tab“;
- Now click on the “Create button” next to “Restore Point”;
- This takes you to a new dialogue box. Here you can add a description of the requirements and settings you want for a restoration point. For example, we are inserting “Install MS Office” or “Before antivirus installation”;
- This implies that we want our Windows OS to restore to a point where MS Office is already installed or restore Windows before installing antivirus software;
- After adding the description, click on “Create“.

Note: If you encounter issues with Windows update or software installation, simply navigate to the “System properties” dialogue box and click on “System restore“.
How to manually perform a restore point in Windows 10 using the Control Panel
Now that we have learned how to enable and create a Windows system restore point, it is time to jump ahead. If you want to do a system restore, perform the following steps:
- Open the Start Menu and type “Control Panel ” to open it;
- Click on “View by” and select “Large icons“;

- Now click on “Recovery” and then on the “Open System Restore” option;


- The System Restore window opens. You can check all the older restore points that ever existed on your Windows with descriptions and dates in this box;
- Furthermore, it also displays the setting type, which refers to whether the System Restore Point was crafted manually or by default. Select any of the restore points you wish to select;


- After selecting an earlier restore point, you can click on “Scan for affected programs“. This will show all the installed programs and applications that will be deleted during the system restore procedure;
- After reviewing the affected programs, you can proceed by clicking “Next“;

- A confirmation box pops, informing us that once began, the system restore feature cannot be interrupted. Click “Yes” to start system restore.
Note: System Restore is just like updating your Windows. You cannot use your computer during the restore process, and it usually takes a little while.
A System Restore simply resets and reverts your operating system to a particular set of settings for normal functioning.
Your Windows restarts while system restore occurs, and once restarted, you receive a pop-up message that says system restore completed successfully. It also shows the date of your system restore point for further reference.
Note: A system restore does not affect your hard drive data. It simply reverts and affects the Windows settings and files that are necessary for its operation. These files are stored in your C drive storage. However, if you are concerned about your data loss, we advise you to backup all your data from the system drive.
Wrap Up
System Restore simply resets your Windows and all the operating system settings to a default mode that is either created manually or automatically by Windows.
If you create a System Restore Point while your computer is in a perfect functional state, it can be beneficial to revert to these settings if any lapse happens later.
Check out some of our other awesome articles:
- How to protect a folder with a password in Windows 10?
- Remove a Microsoft account from Windows 10: how to do it?
- Changing the DNS in Windows 10
- How can I flush DNS in Windows 10?
- Finding and changing IP address in Windows 10
- How can I clear the clipboard contents in Windows 10?
- How can I open Task Manager in Windows 10?
- Changing the language in Windows 10
- How to show the battery percentage in Windows 10?
